Getting Started with Cisco ACI
July 15, 2019

In my previous post, I presented a general overview of Cisco ACI and why it is a good thing for data center networks. But what does it take to get started in ACI? Nearly every time I have a discussion about deploying ACI into a Data Center, the response I get back is a question along the line of lines of, “That’s a big deployment,” or “That’s going to need a lot of equipment.” But in reality, ACI can be deployed in small data center environments without a huge equipment purchase. From a hardware perspective, ACI consists of three types of components.
- Spine switches: The backbone of your network infrastructure
- Leaf switches: The switches that manage your device connections
- Application Policy Infrastructure Controllers: ACI’s policy-based management infrastructure
You can get started at a minimum with just 2 spine switches, 2 leaf switches, and 3 APICs. That’s seven pieces of hardware, but you can cut that down to 5 pieces of hardware, which I’ll provide details on how in this post.
Spine Switches
In an ACI deployment, spine switches can come in two varieties. The Nexus 9500 modular switch and the fixed switch architecture on the Nexus 9364C & 9332C models. These switches utilize a specific hardware ASIC which is what gives them the spine functionality.
If you are looking to do a large scale ACI deployment in your data center, you will want to go to the 9500 modular spine switches. These switches come in three varieties: 9504, 9508, 9516 with the last two numbers, -04, -08, -16 indicating the number of switching modules slots each switch has. Note that the 9500 switches also have slots for two supervisor modules, but that number is not included in the switching module number specified. A 9504 has slots for 4 switching modules plus two additional slots for supervisor modules.
For smaller ACI deployments, you’ll want to look at the 2U Nexus 9364C or the 1U 9332C switches. These switches have either 64 or 32 40/100G QSFP switching ports.
The spine switches will connect to the leaf switches in the ACI network with each spine connecting to each leaf and forming the backbone of the network. This spine-leaf topology layout facilitates east-west traffic that has developed in today’s data centers. As the backbone of the network, the spine switches maintain a database of all known endpoints in the ACI network and facilitates traffic flow between the leaf switches. In an ACI deployment, it is recommended to start with at least two spine switches and to scale spine switches in even numbers.
Leaf Switches
With exception to the two 9300 spine switch modules listed, the leaf switches will be Nexus 9300 switches, which come in multiple forms to meet the specifications required for your endpoint connectivity. Depending on the model of the 9300 switch you are using you will have support for 1/10/25/40/100G speeds. For specific details on the Nexus 9000 switch portfolio, you can look at the data sheets for each device family.
In the ACI network, leaf switches keep track of the endpoints connected to that switch. The leaf switches are also the policy enforcers in ACI, and they are the VTEP devices in ACI’s VXLAN topology. When building an ACI network, leaf switches connect to endpoints and spine switches. Do not connect a leaf switch to another leaf switch, if you do so the ports will be disabled.
When deploying ACI, it is recommended to start with at least two leaf switches.
Application Policy Infrastructure Controller (APIC)
The Application Policy Infrastructure Controller or APIC is the device that creates policy and is your ACI management interface. You can interact with an APIC in three ways, via the GUI by opening a web browser and typing in the APIC IP address, via a NXOS-like shell prompt through an SSH connection to the APIC, or by using APIs (available through DevNet) to write programs that directly interface with the APIC. While the APICs are the management interface for ACI, they are not in the control plane of ACI, which means that if your APICs go down or lose connectivity to the network, your ACI traffic will still flow uninterrupted according to the most recent policy applied.
When you deploy ACI, you should have three APICs that form a cluster, and when scaling APICs you should maintain an odd number of APICs. The APICs will share data and maintain redundancy if there is an APIC failure. APICs come in two forms, a hardware APIC, which is a Cisco UCS C220 server built specifically as an APIC, or a VM APIC which can reside in a VMware environment.
Building an ACI network
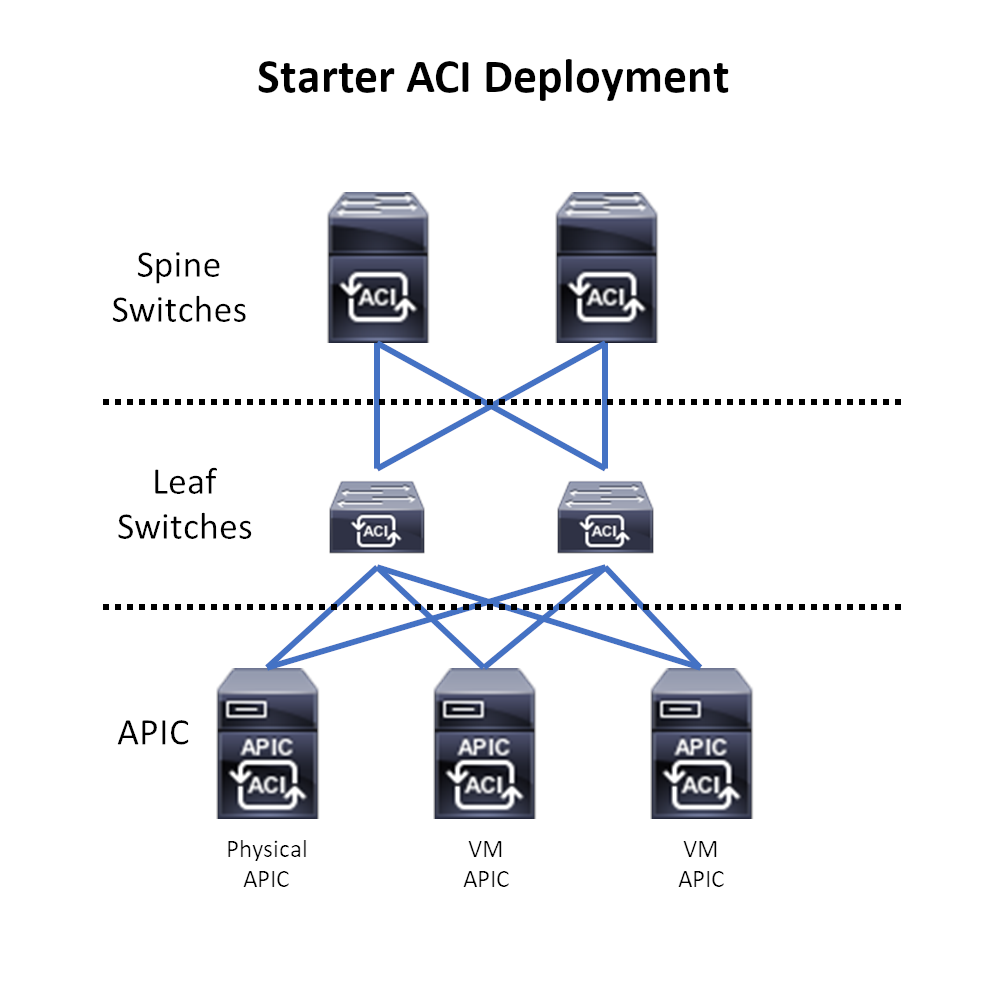
This adds up to seven items, but as I mentioned earlier, at the time of this writing, you can get started with just five pieces of hardware. If you are running a VMware environment, you can start an ACI network with, 2 spines, 2 leaves, 1 physical APIC, and 2 VM APICs.
 Startup ACI Network. 2 Spines, 2 Leafs, 1 Physical APIC, 2 VM APICs
Once you connect everything, you will want to power on the physical APIC(s) and Nexus switches, then run through the initial startup (you will be fed a list of questions). The leaf switches will discover the operational APIC and begin integrating into the ACI fabric, then the spine switches will discover the leaf switches and integrate into the fabric. Once that is complete, you will have a operational ACI fabric. If you are using VM APICs, you will want to connect the servers hosting your VMware environment to the leaf switches and configure the VMM domain in ACI. After the VMware VMM domain is configured in ACI, you and spin up the VM APICs and integrate them into the ACI cluster.
In my next post, I will give an overview of VXLAN. Once you understand VXLAN, you will know what is happening in your ACI network.

